Posts tonen met het label tapioca flour. Alle posts tonen

woensdag 4 mei 2016

pop-up pita's - pop-up pitas (GF-DF-V)


Vorig jaar zag ik op The Great British Bake Off de aflevering waar de kandidaten glutenvrij, lactosevrij en suikervrij moesten bakken.
Paul Hollywood, 1 van de meesterbakkers, had een glutenvrij pitabrood ontwikkelt, die de bakkers moesten namaken.
Het was grappig om te zien, omdat glutenvrij bakken andere vaardigheden veronderstelt dan bakken met gluten. De bakkers hadden vooral problemen met het “kneden” van het deeg, want niet echt nodig in mijn opinie. Het deeg moet zo nat mogelijk blijven om uiteindelijk niet te droog te worden. Zo, dat klinkt Cruijfiaans :-)


Ik heb de pita’s gebakken; ze waren heerlijk, maar het gebruik van 3 eieren voor 12 pitabroodjes (ze waren ook nog eens heel groot!) vind ik een bezwaar. Brood en ei vind ik niks. Ik eet met plezier biologische eieren van mijn boer uit Strijen, maar om nu nog eens 3 eieren te verstoppen in te bakken brood, nou nee.
Dus maakte ik een vegan variant. Het resultaat mag er zijn. Ik ben benieuwd wat je ervan vind. Ik maak er meestal 4 of verdubbel het recept en vries er een aantal in. Je kunt ze heel makkelijk oppiepen in de oven of in een droge koekenpan.


Je hebt nodig:
5 g psylliumvezels, meng in een grote kom met 50 ml water, roer goed door elkaar en zet ±5 minuten apart

50 g boekweitmeel
50 g bruine rijstmeel
25 g tapiocameel
1 el nigellazaad
½ tl zout
3 g suiker
3 g gist

Meng deze droge ingrediënten in een ruime kom.

Roer door het psylliummengsel, dat nu een soort gel is geworden, 1 el olijfolie, ½ tl appelazijn en 100 ml handwarm water. Giet bij de meelmix en roer door elkaar met een pollepel. Roer scheutje voor scheutje nog ongeveer 50 ml water erdoor tot je een dik en plakkerig deeg krijgt.
Dek af met huishoudfolie en zet zeker 1 tot 1 ½ uur op een warme plek om te rijzen.

Zet dan de oven op 200°C.

Strooi rijstmeel op een vel bakpapier of bakmat.
Verdeel het deeg in 4. Pak elk stuk deeg met meelhanden en leg op het bakpapier, bestrooi licht met rijstmeel en druk zachtjes uit tot een ronde pitavorm van ongeveer ½ - 1 cm dikte. Dit gaat heel gemakkelijk, kleeft wel een beetje maar dat hoort erbij.
Herhaal met de andere stukken deeg en schuif het vel met de 4 pita’s erop op de hete bakplaat en in het midden van de hete oven. Bak 5 minuten , draai dan om en bak nogmaals 5 minuten. Je ziet ze oppoffen!


Eet nog warm uit de oven, vul met falafel en salade of wat je maar lekker vindt.


You need:
5 g psyllium husks, mix into a wide bowl with 50 ml of water and set apart for ± 5 minutes

50 g buckwheat flour
50 g brown rice flour
25 g tapioca flour
1 tbsp nigella seeds
1/2 tsp sea salt
3 g sugar
3 g dry yeast

Mix these dry ingrecients into a bowl.

Into the gel-like psyllium mixture stir 1 tablespoon of olive oil, ½ teaspoon apple cider vinegar and 100 ml of luke warm water. Mix well and pour into the flour mix. Stir together with a wooden spoon. Bit by bit add about 50 ml of water, till the dough is thick and sticky.
Cover with clingfilm and let it rise in a warm spot for at least 1 - 1 ½  hours.

Then pre heat the oven on 200°C.


Sprinkle some rice flour on a piece of baking paper or a baking mat.
Divide the dough in 4. Take a piece of the dough with floured hands and put on the paper. sprinkle some rice flour on top and very softly press the dough into a circle of about ½ - 1 cm thickness. It is very easy to do, a bit sticky, but that;s part of the fun.
Repeat with the other 3 pieces and then shift the pitas with the paper on the hot baking tray and bake them in the middle of the oven for about 5 minutes, then turn them and bake another 5 minutes on the other side. You'll notice them puffing up!!

Eat warm, straight out of the oven, fill with falafel and salad or with whatever you like!


maandag 23 november 2015

Lactosevrije en glutenvrije kruidnoten en speculaasstaaf(GF-DF)


Op verzoek maakte ik glutenvrije en lactosevrije kruidnoten.

Terwijl ik het deeg aan het samenstellen was bedacht ik dat ik tegelijkertijd ook gevulde speculaas zou kunnen maken. Aangezien speculaasdeeg maken een 2-daags project is, omdat de smaak van het deeg moet rijpen, kon ik net zo goed even amandelspijs maken, waarvan de smaak ook verbetert door rust en tijd.

Ik verdeelde de droge ingrediënten in twee en voegde aan 1 deel psylliumvezels toe voor de gevulde speculaas. De kruidnoten wil ik enigszins hard en knapperig, de speculaas wat zachter en meer samenhangend.

Sinds ik met psylliumvezels bak, begrijp ik steeds beter hoe deze vezels te gebruiken en hoe ze werken in verschillende baksels.
Het belangrijkste is toch wel dat het het deeg bij elkaar houdt, een soort lijm dus. Het zorgt er ook voor dat een deeg geen harde brokkelige korst wordt. Vroeger gebruikte ik hiervoor xanthangom, maar dit veroorzaakte bij mij buikklachten en het is een zodanig overbewerkt produkt, wat ik liever niet meer gebruik.

Psylliumvezels dus, wat ook zorgt voor een soepele ontlasting, heel belangrijk!

De kruidnoten zijn goedgekeurd door lief en zoon; de gevulde speculaas vertoont nog wel wat barsten maar de smaak en textuur zijn erg goed.


Voor het deeg heb je nodig:
100 g boekweitmeel
15 g tapiocameel
35 g bruine rijstmeel
flinke snuf zout
1 flinke el speculaaskruiden
65 g witte basterdsuiker
1 tl bakpoeder

Meng deze droge ingrediënten goed door elkaar en verdeel over 2 kommen.

Bij kom 1, de kruidnotenmix, voeg je vervolgens toe:
40 g plantenmargarine of boter als je geen problemen hebt met lactose

Bij kom 2, de speculaasstaafmix, voeg je toe:
1 el psylliumvezels, roer goed door en daarna:
40 g plantenmargarine

Snijd de margarine met 2 messen in kleine stukjes en kneed snel met koele hand de beide degen tot een samenhangend geheel. Verpak ze in huishoudfolie en laat 1 nacht in de koelkast rijpen. Plak er eventueel een sticker op om de 2 uit elkaar te houden.

Ondertussen kun je je eigen amandelspijs maken:
Maal 120 g geblancheerde amandelen samen met 60 g rietsuiker en de rasp van 1 biologische citroen tot een soort deeg, eventueel voeg je 1-2 el water toe. Schep in een bakje en laat ook minimaal 1 nacht rijpen. Je kunt de amandelspijs weken bewaren. Of klik op de link voor een suikervrije variant!

Vóór gebruik roer je er een half losgeklopt ei door, waardoor de spijs smeuïg wordt. Je kunt het ook weglaten.

Bakdag
De volgende dag haal je de beide degen en het amandelspijs uit de koelkast en laat deze op kamertemperatuur komen.

de kruidnoten(ongeveer 35 stuks):
Verwarm de oven voor op 175°C.
Bekleed de bakplaat met een vel bakpapier.


Op je werkblad verdeel je het deeg in 2 en rol je ze uit tot een lange sliert van ongeveer 1 cm dik. Snijd stukjes en rol er vervolgens balletjes van die je op de bakplaat legt.


Bak de kruidnoten 12 minuten; ze lopen iets uit. Let erop dat ze niet verbranden; iedere oven is anders!
Laat even afkoelen.

de amandelstaaf ( 6 stukken):
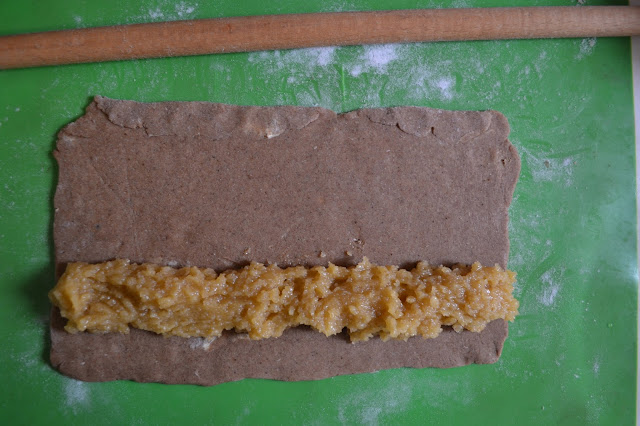
Ondertussen maak je de amandelstaaf door het 2e deeg (mét de psylliumvezels) uit te rollen op een vel bakpapier waar wat rijstmeel op is gestrooid, tot een plak van 10 – 18 cm, ongeveer 3-4 mm dik.
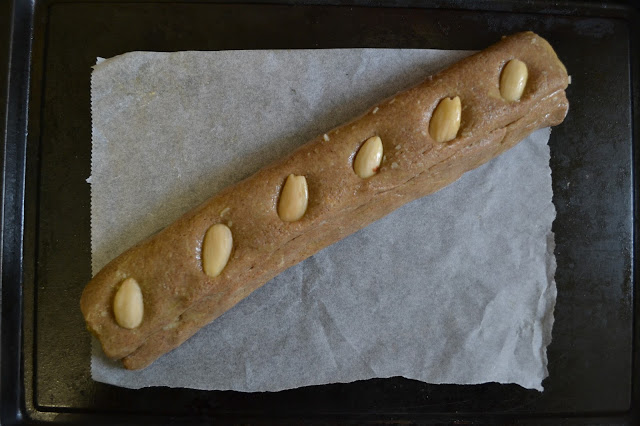
Verdeel zoveel amandelspijs in de lengte over het deeg als je wilt en vouw de rest van het deeg erover heen. Druk zachtjes aan en bestrijk met het overgebleven ei. Druk er hele amandelen in.


Bak in dezelfde oven 20 – 25 minuten tot mooi goudbruin en geurig.
Laat afkoelen op een rekje. Bewaar in een trommel.


Je kunt de 2 natuurlijk ook samen bakken; haal dan wel de kruidnoten eerder uit de oven;-)

donderdag 27 augustus 2015

Glutenvrije chocolate chip oatmeal cookies (GF-eggfree-easily made vegan)


We zijn op weg naar de herfst, helaas, maar het is niet anders. Een nieuw seizoen kondigt zich aan, de dagen worden korter, het licht verandert en de geur van herfst kun je al ruiken in de vroege ochtend. De kruisspinnen verschijnen; waar zijn ze eigenlijk in de zomer?

Het waait en regent soms alsof de herfst al volop bezig is. Mijn voorkeuren veranderen ook mee. Gister had ik zo’n zin in cookies, wat ik al maanden niet heb gehad; iets met kaneel en chocola, iets zoets, iets troostends.

Wat is het internet dan een rijke bron. Ik vond een mooi recept op de site van Love and Lemons, helaas niet glutenvrij en ik had ook geen pure chocola en geen zure gedroogde kersen in huis. Maar de site van Jeanine is zo aantrekkelijk en het recept sprak me aan, dus heb ik er mijn draai aan gegeven en wil het graag met jullie delen.

Dus: hop naar de keuken en bakken die cookies! En vergeet niet de prachtig gefotografeerde en superlekkere recepten op de site van Love and Lemons te bezoeken!


Nodig voor 30 stuks:
2 el gemalen lijnzaad
6 el warm water
1 kop/250 ml boekweitmeel
½ kop/125 ml bruine rijstmeel
½ kop/125 ml tapiocameel
1 tl wijnsteenzuurbakpoeder
1 tl kaneel
½ tl zeezout
150 g boter, op kamertemperatuur of gesmolten kokosolie
1 cup bruine basterd suiker
¼ cup/60 ml ahornsiroop
1 el vanille extract
2 koppen/500 ml Provena havervlokken
1 kop/250 ml rozijnen
½ kop/125 ml witte chocolate chips

Verwarm eerst de oven voor op 175°C en leg een vel bakpapier op de bakplaat.

1. In de beslagkom giet je de eetlepels warm water bij het gemalen lijnzaad, roer even door en laat zeker 10 minuten staan.
2. In een andere kom mix je de meelsoorten, bakpoeder, kaneel en zeezout goed door elkaar. Zet de havervlokken klaar, de chocolate chips en de rozijnen.
3. Voeg boter, basterdsuiker, ahornsiroop en vanille extract bij het lijnzaadmengsel en mix alles met een handmixer 2-3 minuten tot een mooi geheel.
4. Spatel de meelmix er in gedeeltes doorheen tot een kleverig deeg. Vervolgens de havervlokken, de rozijnen en de chocolate chips. Roer tot alles goed is vermengd.
5. Schep volle eetlepels van het deeg op de bakplaat, 6-12 per keer, afhankelijk van de grootte en maak ze plat met een vochtige hand. Ze lopen niet uit.
6. Bak in het midden van de oven 10-12 minuten. Houdt ze in de gaten, ze zijn goed als de buitenrandjes bruin worden. Iedere oven is anders!
7. Schep ze heel voorzichtig op een koelrekje en bak de volgende portie tot alle deeg op is. Ik bakte er 30.

Bewaar in een gesloten trommel. Ook de volgende dag nog zeer lekker!!


My version of Love and Lemons vegan oatmeal cherry chocolate cookies is a gluten free one. I used a little less maple syrup, used white chocolate chips, organic butter and raisins instead of sour cherries. Feel free to add whatever dried fruit you like!

And be sure to check out her beautiful, colourful, fresh and tasty site.

You’ll need for 30 cookies:
2 tbsp ground flax seeds
6 tbsp warm water
1 cup buckwheat flour
½ cup of brown rice flour
½ cup tapioca starch
1 tsp tartaric acid baking powder
1 tsp cinnamon
½ tsp sea salt
2/3 cup organic butter on room temperature or melted coconut oil for a vegan version
1 cup brown sugar
¼ cup maple syrup
1 tbsp vanilla extract
2 cups gluten free rolled oats
1 cup raisins
½ cup white chocolate chips

First pre-heat the oven on 350°F/180°C and put a sheet of baking paper on a baking tray.

1. in the mixing bowl stir together the ground flax seeds with the warm water. Set aside.
2. in another bowl mix together the flours, baking powder, cinnamon and salt. In different small bowls you weigh out the rolled oats, raisins and chocolate chips.
3. put the butter, brown sugar, maple syrup and vanilla extract in the mixing bowl with the flax mixture and mix for about 2-3 minutes until well combined.
4. with a spatula mix in the flour mix in parts till a sticky dough forms. Then the rolled oats, the raisins and the chocolate chips. Stir till all is well combined and a heavy dough has formed.
5. scoop heaped tablespoons of dough on the baking tray and with a wet hand flatten the cookies. They do not run, at least mine didn’t. I baked 12 at a time in the middle of the oven for 12-15 minutes. They are done when the outer edges turn brown. Keep a look at them, every oven is different!
6. very carefully remove them with a flat spoon on a cooling rack and bake the next portion till all the dough has turned into these great cookies!


Store in an airtight container.

donderdag 27 november 2014

Gluten-free buckwheat boule – glutenvrije boekweitbol (GF-DF-V)


As promised I share with you my newly developed buckwheat boule.
It’s kind of funny that I started creating bread again. For many years I just gave up on bread baking and eating it as well. Buying gluten-free bread I gave up really quickly, because it’s inedible, I think. Most of it then. It’s expensive, tastes like cardboard and after a day you can throw it away; filled with starches and gums and other ingredients that has nothing to do with bread.

I did make flat breads a lot, quick and easy, as well as the seed bread that I ate for almost a year now. But suddenly I was craving for a real slice of bread and started my survey.

Bread is flour, water, salt and a rising agent. But, gluten-free bread baking is more than that, the rising is a problem, so can be the taste. There is only 1 advantage when baking gluten-free bread and that is that it doesn’t need any kneading! Just stir everything vigorously and you’re done!

I am going to give you my first new bread recipe of a very good tasting buckwheat boule with a crunchy crust. 
Be aware though that every type of flour, oven, surrounding temperature has influence on your bread, so maybe the first time you bake this bread it’s not perfect yet or it looks different then mine.
Just keep on going and let me know of the results or question me if there are any problems!

You’ll need:
2 cups or 290g of buckwheat flour mix
5g quick yeast
4g of sea salt
5g of cane sugar
2 tbsp of ground flax seeds
2 tbsp of psyllium husks
1 ¼ cup of hand-warm water
2 tbsp of olive oil


Mix the dry ingredients in a big bowl.
Mix water and olive oil in a small bowl and pour straight into the dry ingredients. Mix with a sturdy spoon into a batter-like-dough. It will be a little wet, that’s ok.

I leave the bread overnight with a humid cloth on top on room temperature and bake the bread first thing in the morning.

Pre-heat your oven on 200°C together with the baking tray and a small bowl of water. (to create a slightly moist atmosphere)

Take out the dough carefully and put it on your work bench which is sprinkled with a little flour on a piece of baking paper. Form the dough, do not handle too much!! into a nice boule shape and score the dough with a sharp knife. This is important because the rising of the bread in the hot oven will otherwise crack the bread’s crust.

Put the bread in the oven and after closing the door, immediately put the temperature on 180°C and bake the bread for 1 hour on this temperature. Then after 1 hour lower the temperature to 150°C and bake for another hour. Check the bread with a thermometer. The inside must be between 95° and 100°C. The crust is really crunchy!

Let it cool completely before cutting a slice!

The bread stays well for about 3 days, which I think is very important, so you don’t have to freeze it. It’s a dense bread, not light and fluffy, a real bread so to speak! And gluten-free!

I had some of my friends, wheatbread eaters, have a taste and they were all pleasantly surprised by the taste and structure.
I really hope you like it too!


Je hebt nodig:
5 g instant gist
4 g zeezout
5 g rietsuiker
2 el versgemalen lijnzaad
2 el psyllium husks
310 ml handwarm water
2 el olijfolie

Meng alle droge ingrediënten in een ruime kom.
Meng water en olijfolie en giet in 1 keer bij de droge ingrediënten en roer met een stevige pollepel alles zeer goed door elkaar. Je ziet het mengsel samenkomen tot een op-beslag-lijkend-deeg. Dus wel wat nat, maar net een deeg.

Laat het brood in de kom met een vochtige doek erover een nacht rusten op kamertemperatuur en bak het brood zodra je wakker wordt.

Verwarm de oven voor op 200°C samen met het bakblik en een kommetje water onder in de oven.

Strooi wat meel op een stuk bakpapier en met bebloemde handen neem je voorzichtig het deeg uit de kom en leg het op je werkblad. Vorm in een mooie boule vorm, maar behandel het deeg als een baby, niet knijpen en kneden! 
Kerf het brood in met een scherp mes, zodat het brood niet op onverwachte plek gaat scheuren tijdens het bakken.
Leg het brood in de voorverwarmde oven en sluit de deur. Zet de temperatuur meteen op 180°C en bak 1 uur op deze temperatuur. Zet dan de temperatuur op 150°C en bak nog 1 uur.

De binnentemperatuur van het brood moet nu tussen 95° en 100°C zijn en de korst heel knapperig. Je kunt ook op de bodem kloppen, dit moet hol klinken. Laat het brood helemaal afkoelen voordat je het aansnijdt!


Het brood blijft zeker 3 dagen goed en eetbaar, zodat je het niet hoeft in te vriezen; ik bewaar het in een afgesloten schaal. Het is een stevig, compact brood met een heel goede smaak, niet luchtig maar smeerbaar, makkelijk mee te nemen, heel lekker om even te toasten voor je het eet.

Echt brood en toch glutenvrij!!

Ik heb het brood laten proeven door mensen die gluten eten en zij vonden het allemaal erg lekker en ik hoop jij ook!


maandag 17 november 2014

Gluten-free all-purpose buckwheat flourmix – Glutenvrije boekweitmeelmix


Last week I talked about and used a gluten-free flour mix that I developed lately.
Making a big pot of gluten-free flour mix is a very quick and clever thing to do. Having a ready-to-grab mixture enables you to make your gluten-free baking easier.

A good gluten-free flour mixture includes different ingredients in order to get the best results.
There are different types of gluten-free flours:
* whole “grain” flours, like brown rice flour, buckwheat flour, oat flour, teff flour, quinoa flour, millet flour, sorghum flour, etc.
* “white” flours or starches, like arrowroot, corn starch, tapioca flour, potato starch, white rice flour, etc.
* nut flours, like almond flour, hazelnut flour, coconut flour, chestnut flour
* bean flours, like garbanzo bean flour, fava bean flour and soybean flour

Then, as an addition to make for example bread chewy and bind the ingredients together, I add psyllium husks, chia seeds and/or ground flax seeds. In my beginner’s years of gluten-free baking I used xanthan gum for binding, but I came to the conclusion that it gives me digestive problems like bloating, gas, intestinal cramps and so on, so I don’t use it anymore.

Some baking can be done with just a single flour, think of buckwheat crackers, socca, brownies, cookies, but baking a bread with a single flour mostly turns out hard, dry and not tasty at all. That’s why I make a combination of whole grain, starches, nut flours and 1 of the additions.

So in order to prevent your baking from falling apart and give it some structure as well of taste, which is so different because of the missing link: gluten, the best idea for making a tasty bread or all purpose flour mixture is to make a mix of ingredients.

All flours and starches have different properties, flavours and baking qualities, so in order to make a mix that suits your taste or purpose you can choose to make different mixes. It is also nice to experiment with the flavours.


I want to start and share with you my basic buckwheat all-purpose flour, because I love buckwheat for its taste, it’s easy to digest and it’s considered a complete protein: it contains all 8 essential amino acids, it’s high in fiber, calcium, phosphorus and magnesium. It’s a whole “grain”, so eating it will make you feel satisfied and full.
Brown rice flour I use because it’s versatile, whole grain and not too expensive, a great source of fiber, selenium and magnesium.
Tapioca flour: made from the dried cassave root. It doesn’t contain much nutrition, a little iron and some trace minerals like calcium and copper, no fiber, but it has binding properties, which we need in gluten-free baking and it makes a good crust and a lighter texture. And the price is right too!
Almond flour:  I love the taste and texture of blanched almond flour, it gives baked goods a rich texture and taste as well as moistness. It is high in protein, Vitamin E, magnesium and it’s a low-glycemic food (releases its glucose slowly).

Okay, now grab a big pot and start mixing; I suggest you use a scale because cups can vary much in weight. I give you 3 measurements, 1 to first make a small batch, then double and triple to make a bigger batch.

All-purpose buckwheat flour mix

75-150-225 g brown rice flour
75-150-225 g buckwheat flour
95-190-285 g tapioca flour
45-90-135 g blanched almond flour
Put everything in a pot, close the lid and shake well. That’s it. Now you can make the muffins from last week or these easy-peasy flat breads. Next time I will post a beautiful buckwheat boule recipe with this flour mix!


Basis boekweit meelmix

75-150-225 g bruine rijstmeel
75-150-225 g boekweitmeel
95-190-285 g tapiocameel
45-90-135 g amandelmeel


Doe alles in een grote pot, deksel erop en schudden maar. Klaar voor gebruik! Je kunt nu de pompoenmuffins van vorige week maken of deze makkelijke platte broodjes. Volgende week het recept voor een prachtige boekweitbol!

dinsdag 11 november 2014

Gluten-free pumpkin spice muffins – glutenvrij pompoenmuffins (GF-DF)


Baking warm bread, muffins, speculaas. It's the time of year and how good is it with a warm oven in the kitchen and lovely smells pouring out of it every day. The only problem is that I cannot eat all of it, so I have to restrict myself a bit. 

I bought myself a slow-cooker and am experimenting with it too now. almost every day. I must say that I like the way things cook so far. I made a pumpkin butter from Tasty Yummies, really delightful! I made a creamy brown basmati breakfast porridge, which I will  share shortly and I even baked a gluten-free buckwheat bread in it! 

Making a good and tasty, crusty gluten-free bread is one of my goals this winter. I bought this book and I am really inspired by it. But as you know I cannot follow a recipe to the dot, so I am struggling to make my own variations and I will keep you informed!


Instead of the all-time favourite banana bread I like to bake in autumn, I made these warm flavoured pumpkin spice muffins. They are lightly sweet and rich from the spices and pumpkin puree.


You’ll need:
dry ingredients:
1 cup GF flour mix (next post more about it)
¼ cup almond flour
1 tsp baking powder
¼ tsp sea salt
1 heaped tsp pumpkin spices
1/3 cup of unrefined cane sugar

wet ingredients:
½ cup pumpkin puree
1 organic egg
¼ cup olive oil
1 tbsp vanilla extract
lemon zest
¼ cup + 2 tbsp rice milk or nut milk

Pre heat the oven on 350 °F or 175°C.

Mix the dry ingredients in a big bowl.
Mix the wet ingredients in a small bowl.
Pour wet into dry and mix quickly and well.
Divide over 6 mini loaf pans, or 10 paper muffin liners and bake in the middle of the oven for 40-45 minutes till done. Prick a bamboo skewer inside and when it comes out clean, they are done.
Let them cool a little if you can resist the smell!


Je hebt nodig:
droge ingrediënten:
145 g glutenvrije meelmix (meer hierover in de volgende post)
30 g amandelmeel
1 tl bakpoeder
¼ tl zeezout
1 volle tl speculaaskruiden
50 g ongeraffineerde rietsuiker

natte ingrediënten:
½ cup/125 ml pompoenpuree
1 biologisch ei
¼ cup/60 ml olijfolie
1 el vanille extract
citroenrasp
¼ cup/60 ml + 2 el rijstmelk of notenmelk

Verwarm de oven voor op 175°C.

Meng de droge ingrediënten in een grote kom.
Meng de natte ingrediënten in een kleine kom.
Giet nat in droog en roer snel en goed door elkaar.

Verdeel over 6 mini broodvormpjes of 10 muffin vormpjes en bak in het midden van de oven 40-45 minuten, totdat ze gaar zijn. Prik met een bamboeprikker in het midden en als deze er schoon uitkomt is je pompoen muffin klaar. Laat even afkoelen als je het kunt laten!


maandag 26 mei 2014

Focaccia with black olives, rosemary and garlic – Focaccia met zwarte olijven, rozemarijn en knoflook (GF-SF-V-DF)


Just as I decide I don’t need any other bread recipe, I am in the mood for some nice Italian flat bread, because I want to sweep up the nice juices from a aubergine and bell pepper casserole. I am in love of Mediterranean cuisine!
It’s because we have these super warm summery days this may. Walking barefoot in the kitchen, doors open to the terrace, all my neighbours heating up their BBQ’s, my plants growing, the strawberries getting sweeter and sweeter. What a great time, late spring!


This focaccia is a no-knead bread, best eaten the same day, but the next day eaten was not bad at all, for a gluten free bread. I ate it with one of my best friends, no celiac herself and she loved it!!

Ok then, let’s cook.

Ingredients: 

110 g buckwheat flour
100 g brown rice flour
75 g almond flour
60 g tapioca starch
½ tsp sea salt
1 sachet of organic dry yeast, 9 grams
250 ml warm water
2 tbsp good olive oil
1 tsp apple vinegar
20 black olives, in small bits
2 tbsp fresh rosemary, cut fine
1-2 cloves of garlic, in thin slices
1 tsp Maldon or other salt flakes


Mix the flours and the sea salt with the sachet of dry yeast. Stir in the warm water, olive oil and apple vinegar. Stir vigorously with a spoon. Add pieces of olives and the rosemary and stir them in too. The dough is ready.

On a baking tray, put a piece of baking paper and scoop the dough in the middle.
Wet your hands and flatten the dough into the desired form, about 1cm thick. Slice the garlic. Divide  the slices over the top of the bread.
Cover with cling film and let it rise on a warm spot, about 1 hour or longer till it has risen well. You’ll see!


Pre heat the oven on 200 °C.

Remove the cling film.  Sprinkle with some salt flakes and a good drizzle of olive oil.

Bake the focaccia in the middle of the hot oven till golden brown, about 25-30 minutes. Let it cool and enjoy with some juicy veggie dish.

I also made a very nice variation with black olives, dried oregano and sundried tomatoes, also very yummy.
What is your favourite flavour?


Ingrediënten:

110 g boekweitmeel
100 g bruine rijstmeel
75 g amandelmeel
60 g tapioca meel
½ tl zeezout
1 zakje droge gist, 9 gram
250 ml warm water
2 el goede olijfolie
1 tl appelazijn
20 zwarte olijven, in stukjes
2 el gehakte rozemarijn
2 knoflooktenen, in dunne schijfjes
1 tl Maldon of andere zoutflakes

Meng de eerste 6 ingrediënten in een kom en voeg water, olijfolie en azijn toe. Roer goed door elkaar met een lepel. Voeg dan olijfstukjes en rozemarijn toe en roer nogmaals goed door elkaar.

Bekleed een bakplaat met een vel bakpapier en stort het deeg hierop in het midden. Maak je handen nat en druk de focaccia in de gewenste vorm, ongeveer 1 cm dik. Snijd de teentjes knoflook. Leg ze op het brood.
Pak de bakplaat in met huishoudfolie en laat het brood minimaal 1 uur op een warme plek rijzen. Je ziet het vanzelf!

Verwarm dan de oven voor op 200°C.

Verwijder de folie en bestrooi met zoutflakes en besprenkel met flink wat lekkere olijfolie.
Bak de focaccia in het midden van de hete oven tot goudbruin, ongeveer 25-30 minuten. Laat afkoelen en eet met een sappig groentegerecht.


Een andere variatie die ik maakte was met olijven, gedroogde oregano en stukjes zongedroogde tomaat op olie. Ook erg lekker!
Wat is jou favoriete smaak?


Related Posts Plugin for WordPress, Blogger...